Software Engineer with over a decade of experience in building monolithic to microservices with PHP, Java (Spring), JavaScript (Node, Vue), Erlang/Elixir (Phoenix), Search engineering (Solr, Elasticsearch), Cloud (AWS).
I have been wanting to explore and create a simple blog with Phoenix and Tailwind for quite a long. However, I struggle a bit to get it up and running and also to be able to dockerise to make it ready for production deployment.
Preamble
This is the first part of the series, where I explore, creating a phoenix application, configuring tailwind, dockerizing the application and exploring creating a release, that we can run in production. Note that, we omitted using a Database in this series. I would explore that in a separate section. The goal for this series is to be able to prepare, dockerize, and deploy the phoenix application to production quickly.
What We'll need?
My development machine is macOS, and most of my instructions will be catered for mac, however, instructions could be closer to Linux machines as well.
First, we need to have elixir installed. Please follow the installation instructions from the official elixir website https://elixir-lang.org/install.html
Once you have elixir installed, Erlang will be automatically installed.
Let's check if we have elixir installed. Note that, Erlang will be automatically installed with Elixir.
╰─$ elixir -v
Erlang/OTP 25 [erts-13.1.3] [source] [64-bit] [smp:10:10] [ds:10:10:10] [async-threads:1] [jit] [dtrace]

Elixir 1.14.2 (compiled with Erlang/OTP 25)
Next, we need to install Phoenix application generated to be able to create initial Phoenix application.
╰─$ mix archive.install hex phx_new

// Check if its installed
╰─$ mix phx.new --version
Phoenix installer v1.6.2
The above command would install phoenix generator. Just for info, it will be located under /Users/{username}/.mix/archives/phx_new-{version}
In conclusion, we need to have `Erlang > Elixir > Phoenix generator` to be able to create a new phoenix app.
Initialising the application
As I explained earlier, we create the phoenix application without a database. Use the following command to generate a basic phoneix application.
╰─$ mix phx.new --no-ecto docker_phoenix_tailwind
......
* running mix deps.get
[warning] :rebar is no longer supported in Mix, falling back to :rebar3

We are almost there! The following steps are missing:

    $ cd docker_phoenix_tailwind

Start your Phoenix app with:

    $ mix phx.server

You can also run your app inside IEx (Interactive Elixir) as:

    $ iex -S mix phx.server
// Which will create the project and also installs dependencies

// Then
╰─$ cd docker_phoenix_tailwind
╰─$ docker_phoenix_tailwind > mix phx.server
At the time of this writing, I get the following warning to remove the atom :gettext entry from mix.exs file
warning: the :gettext compiler is no longer required in your mix.exs.
Go ahead and remove this entry.
If you are wondering what is Gettext, it's a module to work with internationalised applications
mix.exs => projection section would look like
// Before
  def project do
    [
     ....
      compilers: [:gettext] ++ Mix.compilers(),
     ....
    ]
  end

// After
def project do
    [
     ....
      compilers: [] ++ Mix.compilers(),
     ....
    ]
  end
Note: Do not remove the dependency gettext from deps secton. Only remove it from project compilers list.
Stop the application (`ctrc-c` twice), and Re-run the application again
╰─$ mix phx.server
Generated docker_phoenix_tailwind app
[info] Running DockerPhoenixTailwindWeb.Endpoint with cowboy 2.9.0 at 127.0.0.1:4000 (http)
[info] Access DockerPhoenixTailwindWeb.Endpoint at http://localhost:4000
[watch] build finished, watching for changes...
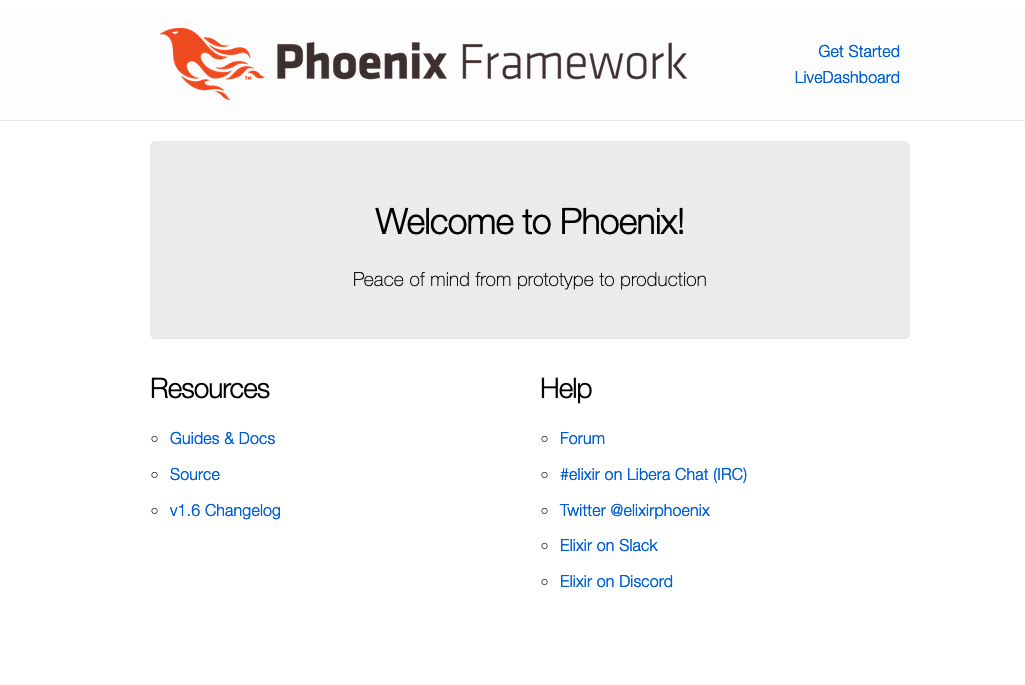
By default, applications run at port 4000, type http://localhost:4000 in your browser, and you will be greeted with the Phoenix Framework home page.
Monitoring and Debugging
Another cool thing about the Phoenix framework is that it comes with a default LiveDhasboard that provides real-time monitoring and debugging tools for the application. Head over to http://localhost:4000/dashboard to view the LiveDashboard

Source: https://hexdocs.pm/phoenix_live_dashboard/Phoenix.LiveDashboard.html
That's it in this episode. In the next article, we explore configuring Tailwind with our Phoenix application.